 Experienced
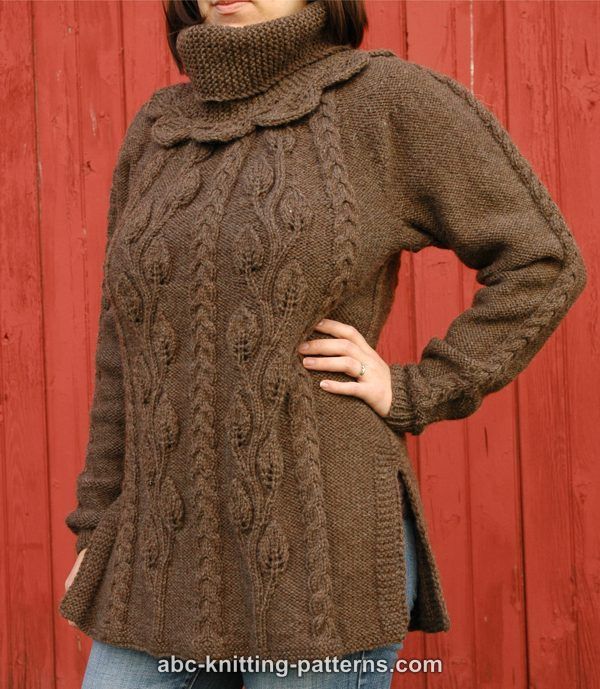
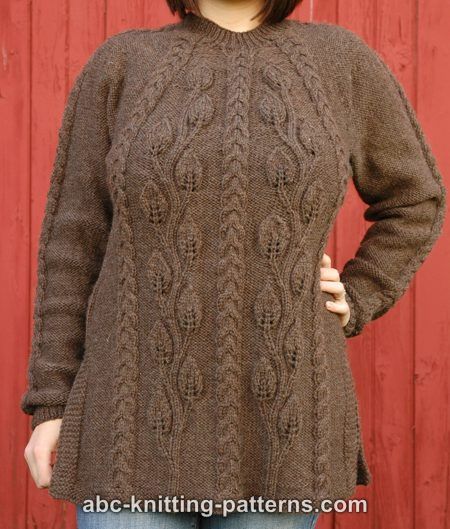
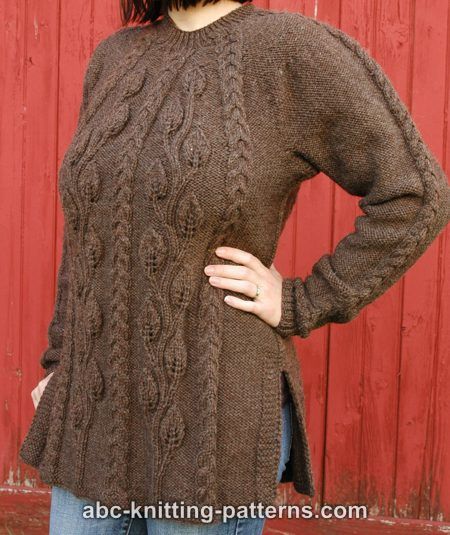
Free Sweater Knitting Pattern
The pattern for the Leaf Cowl is here

Skills Required/Techniques Used:
---Knit & purl, cast on & bind off
---Increasing: yarn over (YO), make 1 (m1)
---Decreasing: knit 2 together (k2tog), slip-slip-knit (ssk)
---Working in the rounds
---Working cable patterns---Working short rows with wrap and turn
Sizes: S (M, L, XL, 2X)
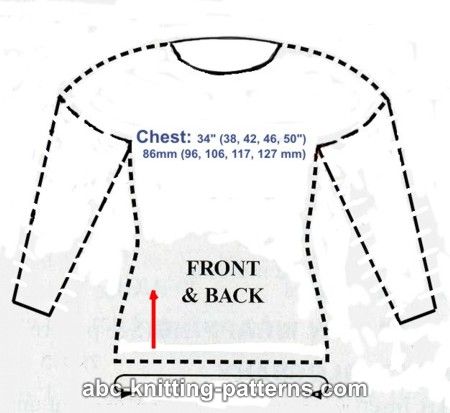
FINISHED MEASUREMENTS
Chest: 34 [38, 42, 46, 50] inches (86 [96, 106, 117, 127] cm
Materials: Lion Brand (affiliate link) Fishermen's Wool [100% wool; 465 yd/458 m per 227g skein] color: Nature's Brown; 3 (4, 4, 5, 6) skeins
Needles: US 8 (5.0 mm) straight and circular (16", 24" 32")
Notions: yarn needle, cable needle
Gauge for stockinette st: 18 sts x 26 rows = 4" x 4" (10 x 10 cm)
Abbreviations:
k - knit
p - purl
st, sts - stitch, stitches
k2tog - knit 2 together
ssk - slip-slip-knit
psso - pass slipped stitch over
sk2p - slip 1 knitwise, k2tog, psso (2 sts decrease)
yo - yarn over
RS - right side
WS - wrong side
pm - place marker
sm - slip marker
M1 (Make 1 increase) - make a backward loop over the right-hand needle and in the next row purl it as a regular stitch.
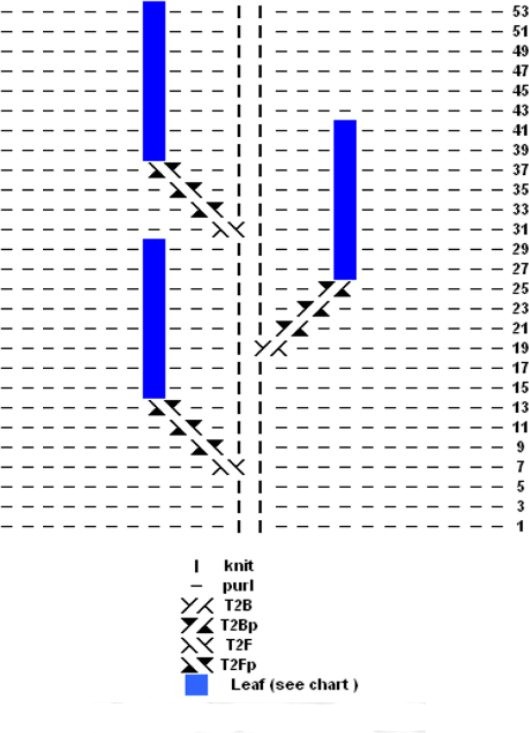
T2B (Twist 2 Back) - slip a stitch on a cable needle and leave it at the back of work, knit next stitch, knit the stitch from the cable needle
T2Bp (Twist 2 Back, purl) - the same, except you purl the stitch from the cable needle instead of knitting it.
T2F (Twist 2 Front) - slip a stitch on a cable needle and leave it at the front of work, knit next stitch, knit the stitch from the cable needle
T2Fp (Twist 2 Front, purl) - same as above, except you purl the stitch from the cable needle instead of knitting it.
Pattern Notes:
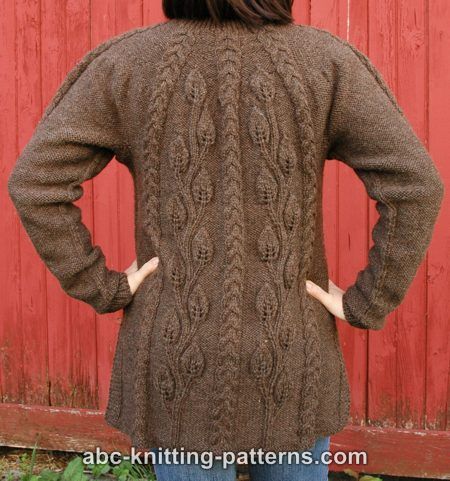
Embossed Vine Leaves Panel
Left Panel on 24 sts in rows:
Row 1 (RS), 3 and 5: p 11, k 2, p 11.
Row 2 and all even,WS, rows: Work all stitches on the wrong side as they appear (If the stitch was knitted in the odd row, you purl it in the even row, if the stitch was purled in the odd row, you knit it in the even row. The yarn overs from the odd rows--starting from row 15--are to be purled.)
Row 7: p 10, T2B, k 1 , p 11.
Row 9: p 9, T2Bp, k 2, p 11.
Row 11: p 8, T2Bp, p 1, k 2, p 11.
Row 13: p 7 , T2Bp, p 2, k 2, p 11.
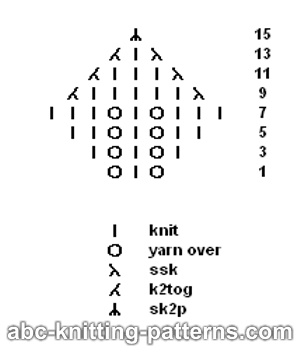
Row 15: p 7, yo (yarn over needle), k 1, yo, p 3, k 2, p 11.
Row 17: p 7, k 1, yo, k1, yo, k 1, p 3, k 2, p 11.
Row 19: p 7, k 2, yo, k1, yo, k2, p 3, k1, T2F, p 10.
Row 21: p 7, k 3, yo, k 1, yo, k 3, p 3, k 2, T2Fp, p 9.
Row 23: p 7, ssk, k 5, k2tog, p 3, k 2, p 1, T2Fp, p 8.
Row 25: p 7, ssk, k 3, k2tog, p 3, k 2, p 2, T2Fp, p 7.
Row 27: p 7, ssk, k 1, k2tog, p 3, k 2, p 3, yo, k 1, yo, p 7.
Row 29: p 7, sk2p (slip 1 knitwise, k2tog, psso), p 3, k 2, p 3, k 1, yo, k 1, yo, k 1, p 7.
Row 31: p 10, T2B, k 1, p 3, k 2, yo, k 1, yo, k 2 , p 7.
Row 33: p 9, T2Bp, k 2, p 3, k 3, yo, k 1 , yo, k 3, p 7.
Row 35: p 8, T2Bp, p 1, k 2, p 3, ssk, k 5, k2tog, p 7.
Row 37: p 7, T2Bp, p 2, k 2, p 3, ssk, k 3, k2tog, p 7.
Row 39: p 7, yo, k 1, yo, p 3, k 2, p 3, ssk, k1, k2tog, p 7.
Row 41: p 7 , k1, yo, k1, yo, k1, p 3, k2, p 3, sk2p, p 7.
Row 43: Repeat rows 19 - 42.
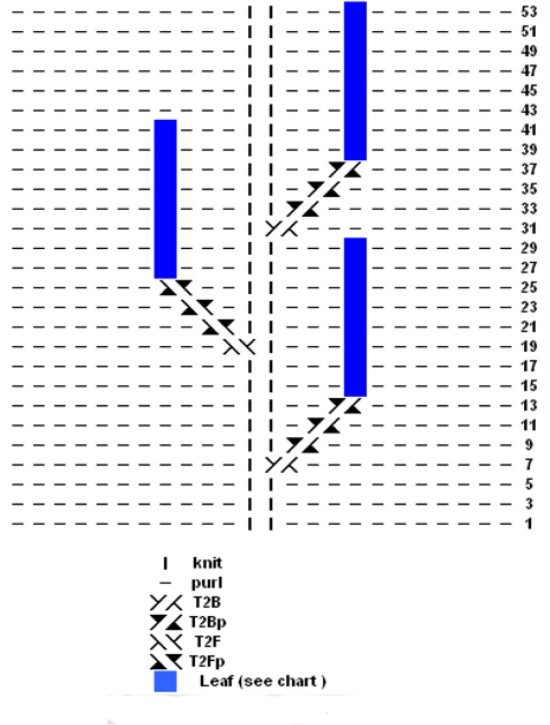
Right Panel on 24 sts in rows:
Mirror the left panel (see chart below)
Leaf Panel in rounds:
All odd rounds are made in the same way as odd rows.
In all even rounds knit over k, purl over p, and knit over yo stitches.
Horseshoe Cable on 8 sts in rows:
Rows 1 (RS): sl 2 sts to a cable needle and hold in front, k2, then k2 from cable needle, sl next 2 sts to cable needle and hold in back, k2, then k2 from cable needle.
Rows 2, 4, 6 and 8: purl 8
Rows 3, 5 and 7 (RS): k 8
Repeat rows 1-8
Horseshoe Cable on 8 sts in rounds:
Round 1 as row 1,
Rounds 2 through 8, knit
Reverse stockinette in rows:
Row 1 (RS) purl
Row 2 knit. Repeat rows 1 and 2.
Reverse stockinette in rounds: All rounds purl.
Garter Stitch in rows: all rows knit
Garter Stitch in rounds:
Round 1: knit,
Round 2: purl. Repeat from round 1.
1:1 ribbing in rounds:
All rounds *k1, p1 repeat from * across the round.
Edge stitches: slip the first stitch in the row and purl the last one.
Short Overview of the Pattern:
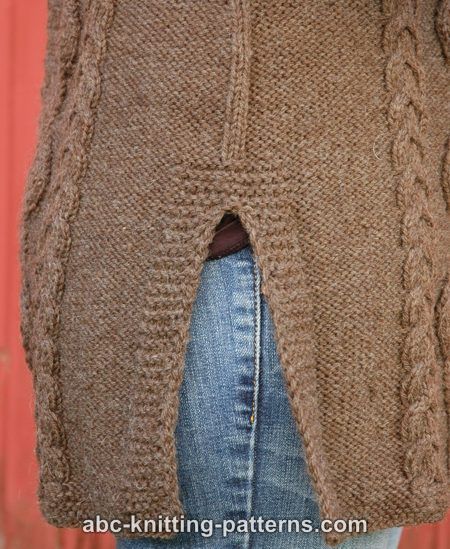
The tunic is worked bottom up. First the front and the back are worked separately forward and back to form side slits, then the stitches of both parts are transferred onto long circular needles and the bodice is worked in rounds up to the underarms. The sleeves are worked bottom up in rounds with horse shoe cable pattern along the central axis of the sleeve. Then the sleeve stitches and bodice stitches are transferred to one pair of circular needles and worked together in the round. The sweater is finished with a round yoke. The neckline is shaped with short rows.
Tunic
Front:
Cast on 96 (104, 112, 132, 152) sts. and work 6 rows in garter stitch - all rows knit. The first and the last stitch in the row are edge stitches.
Row 1 (foundation, RS) and all odd rows, for convenience place marker before each panel:
k 6 (garter st panel); pm, p 6 (10, 14, 19, 24) (reverse stockinette panel); pm, k 8 (horseshoe cable on 8 sts); pm, p 11, k 2, p 11 (right leaf panel on 24 sts); pm, k 8 (horseshoe cable on 8 sts); pm, p 11, k 2, p 11( left leaf panel on 24 sts); pm, k 8 (horseshoe cable on 8 sts), pm, p 6 (10, 14, 19, 24) (reverse stockinette panel), pm, k 6 (garter st panel).
Slip markers while knitting. Work each panel as described is Pattern Notes. After several rows, when the patterns are established and become visible, you can remove the markers.
Note: for the leaf panels, work 5 more rows like the foundation row: RS: p11, k2, p11, WS: k11, p2, k11. Start the leaf pattern from row 7 (RS) of the working piece.
Work 50 rows. Set the working piece aside for the time being.
Back:
Cast on 96 (104, 112, 132, 152) sts and work 50 rows the same way as the front.
Body of the Tunic:
Take the front piece, start working next RS row as established, transferring the working piece to the US #8 24" long circular needles. Work to the end of the row. Take the back piece and work next RS row as established to the end of the back piece, transferring to the same circular needles. Join into round, and continue to work in rounds from this point.
Place a marker before the first st of the front to mark the beginning of the round.
Work 5 more rounds established, see again how to work the stitches in rounds.
In the next round, work the garter stitch panels (6 sts in the beginning and end of the front and back pieces) as follows: k1, p5, work all panels as established till the 12 garter stitches: p 5, k 2, p 5, work all panels as established to the last 6 garter sts: p5, k1. So instead of garter stitch panels you will have reverse stockinette and 2 k sts which imitate the side seam. Continue to work reverse stockinette in place of garter stitch panels.
Work 40 more rounds as established. While working the last round, bind off the last 4 (6, 8, 10, 12) sts of the front and first 4 (6, 8, 10, 12) sts of the back, 8 (12, 16, 20, 24) sts in all; go on working the back, then bind off the last 4 (6, 8, 10, 12) sts of the back and the first 4 (6, 8, 10, 12) sts of the front, 8 (12, 16, 20, 24) sts in all. Move the marker to the first open st on the front, to mark the new point of the beginning of the round.
Set the body aside.
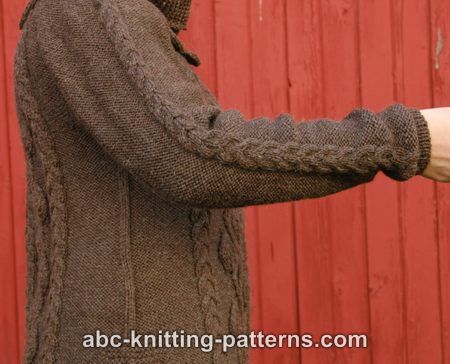
Sleeve:
Cast on 40 sts, join in a round, place a marker at the beginning of the round. Work 12 rounds in 1:1 rib.
Round 1 (foundation): k1, m1, p15, k8 (horseshoe cable panel), p15, m1, k1 = 42 sts
In the next round purl the m1 sts.
Work in rounds as established, make 1 st after the first knit st and before the last knit st in every forth round. Increase total 19 (21, 23, 26, 29) times
Work 118 rounds (the length of the sleeve is 20" (50 cm) ) or to desired length of the sleeve. While working the last round, bind off 4 (6, 8, 10, 12) sts in the beginning and 4 (6, 8, 10, 12) sts at the end of the round. Set aside.
Work the second sleeve the same way.
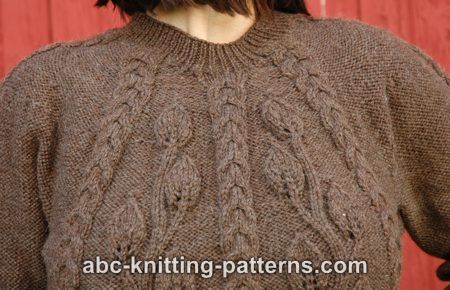
Yoke:
Work the front as established until the bound off sts, transferring the stitches to the 32" long needles. Then work the sts of the right sleeve, then work the back, then work the left sleeve stitches.
Thus you have transferred the work to longer needles and connected all parts together. Place a marker at the beginning of the round, which starts on the proper left side of the front.
Size S
Work 19 rounds as established.
In round 20, in order to finish the leaf vine, start making one leaf over the k2 sts of the leaf panels: purl till k2 sts, yo, k2tog, yo, purl till the end of the leaf panel. In the following rounds work the leaf by the pattern.
Work 2 more rounds as established.
In round 23 work the leaf and cables as established, work the purl sts as follows: *p1, p2tog - repeat across the round.
Work rounds 24-30 as established.
In round 31: work the cables as established, work the purl sts as follows: *p2tog, p1 - repeat across the round, between the cables.
Work rounds 32-40 as established.
In round 41: work the cables as established, the purl sts as follows: *p2tog - repeat across the round between the cables.
Work 2 more rounds (42 and 43) as established.
Size M
Work 21 rounds as established.
In round 22 in order to finish the leaf vine, start making one leaf over the k2 sts of the leaf panels: purl till k2 sts, yo, k2tog, yo, purl till the end of the leaf panel. In the following rounds work the leaf by the pattern.
Work 2 more rounds as established.
In round 25 work the leaf and cables as established, work the purl sts as follows: *p1, p2tog - repeat across the round.
Work rounds 26-32 as established.
In round 33 work the cables as established, work the purl sts as follows: *p2tog, p1 - repeat across the round, between the cables.
Work rounds 34-42 as established.
In round 43 work the cables as established, work the purl sts as follows: *p2tog - repeat across the round between the cables.
Work 2 more rounds (44 and 45) as established.
Size L
Work 23 rounds as established.
In round 24 in order to finish the leaf vine, start making one leaf over the k2 sts of the leaf panels: purl till k2 sts, yo, k2tog, yo, purl till the end of the leaf panel. In the following rounds work the leaf by the pattern.
Work 2 more rounds as established.
In round 27, work the leaf and cables as established, work the purl sts as follows: *p1, p2tog - repeat across the round.
Work rounds 28-34 as established.
In round 35 work the cables as established, work the purl sts as follows: *p2tog, p1 - repeat across the round, between the cables.
Work rounds 36-44 as established.
In round 45 work the cables as established, work the purl sts as follows: *p2tog - repeat across the round between the cables.
Work 2 more rounds (46 and 47) as established.
Size XL
Work 25 rounds as established.
In round 26 in order to finish the leaf vine, start making one leaf over the k2 sts of the leaf panels: purl till k2 sts, yo, k2tog, yo, purl till the end of the leaf panel. In the following rounds work the leaf by the pattern
Work 2 more rounds as established.
In round 29 work the leaf and cables as established, work the purl sts as follows: *p1, p2tog - repeat across the round.
Work rounds 30-36 as established.
In round 37 work the cables as established, work the purl sts as follows: *p2tog, p1 - repeat across the round, between the cables.
Work rounds 38-46 as established.
In round 47 work the cables as established, work the purl sts as follows: *p2tog - repeat across the round between the cables.
Work 2 more rounds (48 and 49) as established.
Size 2X
Work 27 rounds as established.
In round 28 in order to finish the leaf vine, start making one leaf over the k2 sts of the leaf panels: purl till k2 sts, yo, k2tog, yo, purl till the end of the leaf panel. In the following rounds work the leaf by the pattern
Work 2 more rounds as established.
In round 31 work the leaf and cables as established, work the purl sts as follows: *p1, p2tog - repeat across the round.
Work rounds 32-38 as established.
In round 39 work the cables as established, work the purl sts as follows: *p2tog, p1 - repeat across the round, between the cables.
Work rounds 40-48 as established.
In round 49 work the cables as established, work the purl sts as follows : *p2tog - repeat across the round between the cables.
Work 2 more rounds (50 and 51) as established.
Shaping the neckline with short rows.
Mark the first and the last sts of the central front cable with markers.
Work the front as established to the last st before the first marker on the front cable, wrap, turn, start working back. You are working in rows now, this back row is the wrong side of your work. Don't forget to work all stitches on the wrong side as they appear (If the stitch was knitted on the RS, you purl it on the WS, if the stitch was purled on the RS, you knit it on the WS)
Work to the last st before the second marker, wrap, turn. Work the right side row as established to the last 3 sts before the marker, wrap, turn. Work back the wrong side row.
Work 12 (14, 16, 16, 16) short rows in all (forward and back), each time increasing the number of sts between the turn and the marker by 2.
Then work in round the 1:1 rib over all sts. Work 8-12 rounds of rib. Bind off.
Finishing:
Sew the underarms. Weave in all yarn ends. Block.
Enjoy!

| Patterns: | Knit >> Sweaters and Tops |
| Difficulty Level: | 4-Experienced |
| Size: | 2X L M S XL |
| Technique: | Cable |
| Yarn Weight: | Worsted |
| Yarn Brand: | Lion Brand |