 Experienced
Free Child's Sweater Knitting Pattern

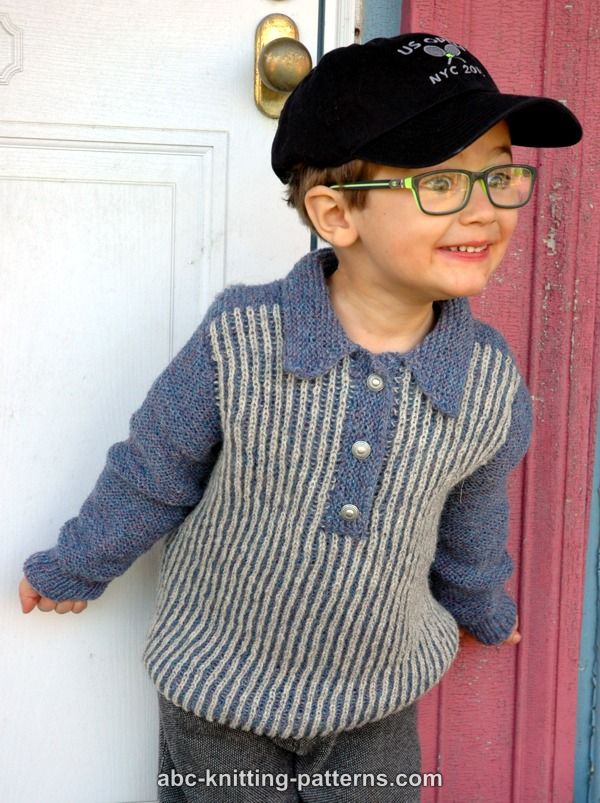
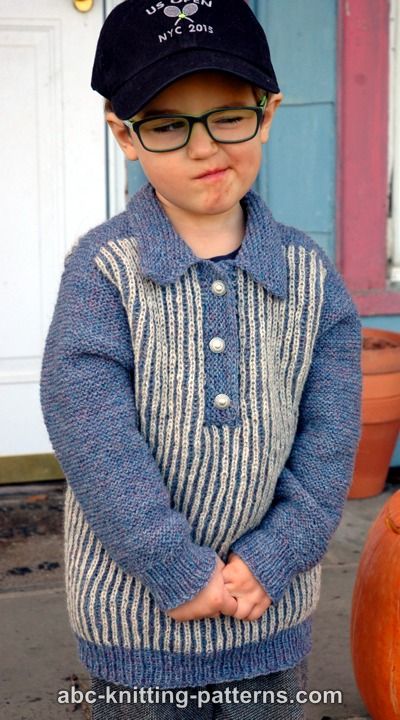
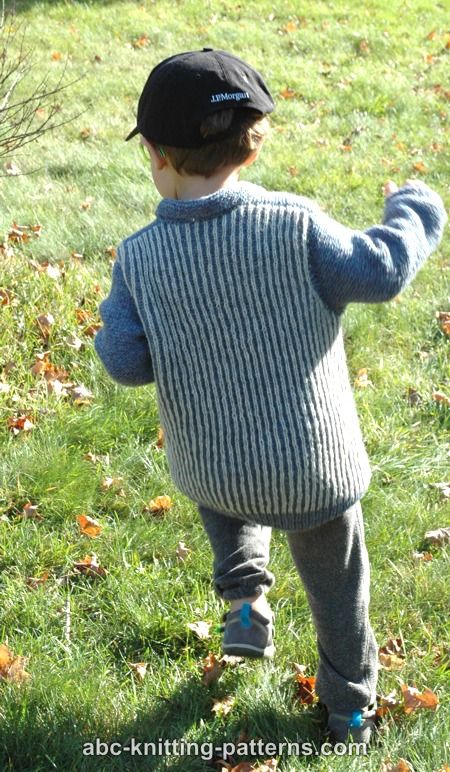
I wanted to make a sweater for my grandson that would keep him warm, fit comfortably while he was running and didn’t look like something his old grandmother made him :) I think it came out quite nice! He of course wouldn’t hold still for any of the photos.
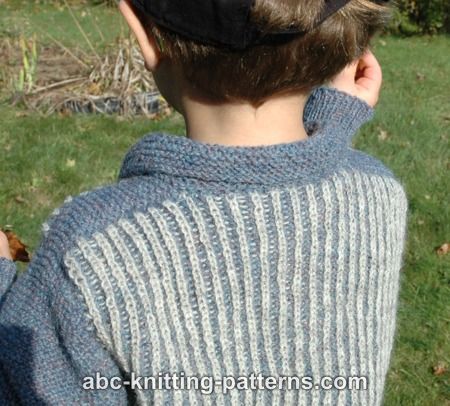
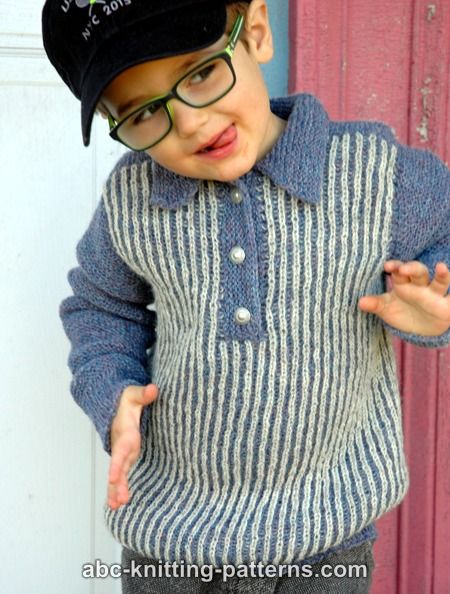
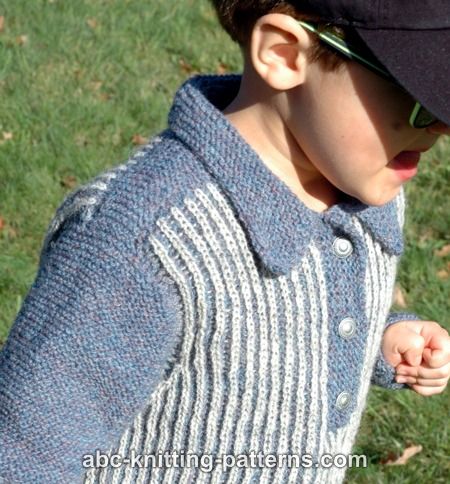
I combined brioche stitch and garter stitch in this child’s pullover, since these patterns have the same gauge and therefore are easily combined in one garment. The pullover features a seamless saddle shoulder. Brioche was used for the body, while the sleeves, shoulders and collar were made with garter stitch. This makes them more flexible for active play.
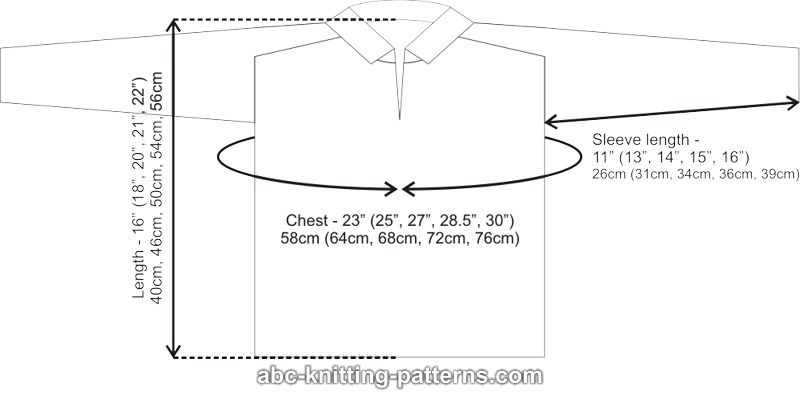
Size: 2 (4, 6, 8, 10)
Finished Measurements:
Chest: 23 (25, 27, 28.5, 30) inches [58 (64, 68, 72, 76) cm]
Length: 16 (18, 20, 21, 22) inches [40 (46, 50, 54, 56) cm]
Sleeve Length: 11 (13, 14, 15, 16) inches [26 (31, 34, 36, 39) cm]
Materials: Jamieson's Shetland Spindrift fingering weight yarn (100% Shetland wool) 115 yards (105 meters)/ 25 grams, color 175 Twilight - 4 (5, 5, 6, 8) balls (DC)
Jamieson's Shetland Spindrift fingering weight yarn (100% Shetland wool) 115 yards (105 meters)/ 25 grams, color Light Grey - 2 (2, 2, 3, 3) balls (DC)
3 small buttons
Note on the yarn weight: Jamison Shetland yarn although considered a fingering weight yarn is slightly thicker than most fingering weight yarn. That is why I think this pattern could be knitted in sport weight yarn also, provided you achieve the required gauge.
Needles: US 2 (2.75 mm) circular needles 21” (52 cm) and 16” (40 cm) and 1 dpn. 16-inch circular needles are for sleeves.
Gauge
20 sts/48 rows = 4" (10 cm) in garter stitch
20 sts/28 rows = 4" (10 cm) in brioche stitch
Note that 1 row of brioche consists of 1 row of LC and 1 row of DC
Pattern Notes
Abbreviations
Please note that I use Nancy Marchant terminology for brioche stitch. I highly recommend her books Knitting Brioche: The Essential Guide to the Brioche Stitch and Knitting Fresh Brioche: Creating Two-Color Twists & Turns, as well as her lessons on Craftsy. You can also visit her website at http://www.briochestitch.com/
Wrap and turn (w&t) in the short rows:
With yarn in front sl 1 stitch to the right needle
Move yarn between the needles to the back
Slip the stitch back to the left needle
Turn the work and bring yarn back to the wrong side between the needles
Garter st in rows
All rows knit
Garter st in rounds
Round 1 – knit
Round 2 – purl
Repeat rounds 1-2
Rib 1x1 in rounds:
All rounds k 1, p 1.
Two-Color Brioche Stitch in rows
Please note that one brioche row consists of 2 rows, one worked in LC and the other in DC. Both colors are worked in one direction, then the work is turned and both colors are worked in the other direction.
Odd number of stitches
Set-up row (LC): k1, *sl1yof, p1, rep from *, end with sl1yof, p1. Do not turn, slide work to the other end of the needle.
Set-up row (DC): sl1, yb, *brk1, yfsl1yo, repeat from *, end with brk1, yb, sl last st. Turn.
Row 1 (LS, LC): k1, *yfsl1yo, brk1, repeat from * to last 2 sts, end with yfsl1yo, k1. Do not turn, slide work to the other end of the needle.
Row 1 (LS, DC): sl1, yf, *brp1, sl1yof, repeat from * to last 2 sts, end with brp1, yb, slip last st. Turn.
Row 2 (DS, LC): p1, *sl1yof, brp1, repeat from * to last 2 sts, end with sl1yof, p1. Do not turn, slide work to the other end of the needle.
Row 2 (DS, DC): sl1, yb, *brk1, yfsl1yo, repeat from * to last 2 sts, end with brk1, yf, sl last st. Turn.
Repeat rows 1-2
Two-Color Brioche Stitch in rounds
Please note that one brioche round consists of 2 rounds, one worked in DC and the other in LC.
Set up round (DC): *k1, yfsl1yo, repeat from * to the end of the round. Bring the LC yarn forward and leave it hanging in front of the work.
Set up round (LC): yf, *sl1yof, brp1, repeat from * to the end of the round. Bring the DC yarn back.
Round 1 (DC): yb, *brk1, yfsl1yo, repeat from * to the end of the round. Bring the LC yarn forward and leave it hanging in front of the work.
Round 1 (LC): yf, *sl1yof, brp1, repeat from * to the end of the round. Bring the DC yarn back.
Repeat round 1 (DC and LC).
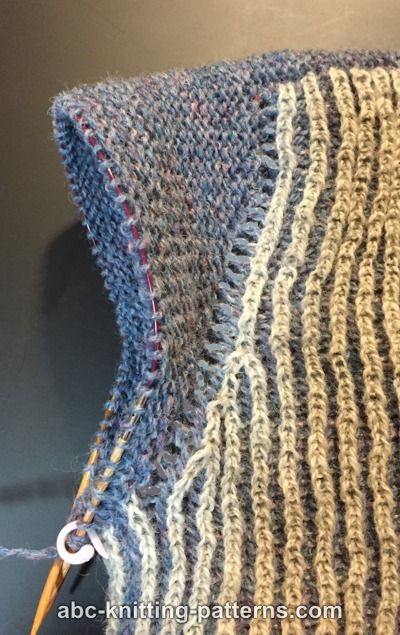
Chain Selvedge for Two-Color Brioche Stitch
The selvedge is worked at the beginning and the end of the brioche st rows in the front and back of the sweater, consisting of 1 st on both ends of each row. It is important to work DC as chain selvedge, because the stitches for the sleeve will be picked up from it.
Row 1 (LS LC): Beginning of the row: bring LC under DC, sl 1, end of the row: sl 1.
Row 1 (LS DC): Beginning of the row: k 1, end of the row: k 1.
Row 2 (DS LC): Beginning of the row: bring LC under DC, sl 1, end of the row: sl 1. Do not turn, slide work to the other end of the needle.
Row 2 (DS DC): Beginning of the row: p 1, end of the row: p 1.Turn.
Sweater
The sweater is worked top-down, with seamless saddle shoulders. The shoulder, sleeves, collar and button bands are worked in garter stitch. The body of the sweater is worked in two-color brioche stitch in the rows and then in the rounds. The sleeves are seamless saddle sleeves.
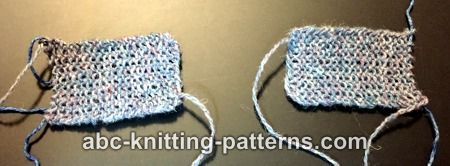
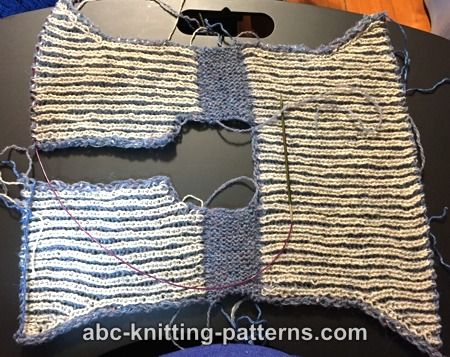
Shoulder Strips
With DC cast on 8 sts and work 34 (36, 40, 42, 46) rows in garter st. Finish the strips with a right-side row. Since garter stitch is reversible, that means that the last row should be a knit row with the yarn dangling at the end of the row. Transfer the sts to a length of yarn. Work another strip for the other shoulder and transfer the sts to a length of yarn.
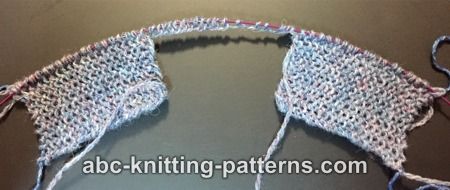
Back
Lay the saddle strips with their cast-on edges facing each other. Secure the yarn to the outer corner of the right-hand strip and pick up 16 (16, 18, 19, 19) sts from the side of this strip, working from the outer edge toward the center. Cast on 17 (19, 19, 19, 21) sts for the neck, pick up 16 (16, 18, 19, 19) sts from the side of the left-hand shoulder strip, working from the center outward. Turn.
Next wrong side row is the set-up row for two-color brioche stitch. First and last stitches are selvedge sts.
Set-up row (LC): sl 1, *sl1yof, p1, rep from *, end with sl1yof, sl 1. Do not turn, slide work to the other end of the needle.
Set-up row (DC): p1, yb, *brk1, yfsl1yo, repeat from *, end with brk1, p l last st. Turn.
Row 1 (LS, LC): bring LC under DC, sl 1, *yfsl1yo, brk1, repeat from * to last 2 sts, end with yfsl1yo, sl1. Do not turn, slide work to the other end of the needle.
Row 1 (LS, DC): k1, yf, *brp1, sl1yof, repeat from * to last 2 sts, end with brp1, yb, k1 last st. Turn.
Row 2 (DS, LC): bring LC under DC, sl1, *sl1yof, brp1, repeat from * to last 2 sts, end with sl1yof, sl1. Do not turn, slide work to the other end of the needle.
Row 2 (DS, DC): p1, yb, *brk1, yfsl1yo, repeat from * to last 2 sts, end with brk1, p1 last st. Turn.
Repeat rows 1-2 22 (22, 22, 22, 24) more times.
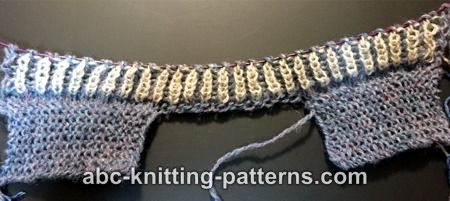
On RS, place marker on the 1st and last brk stitches. This is where increases for the underarm shaping are made.
Next 8 (12, 12, 16, 16) rows work as established and increase for 2 sts at the beginning and the end of the row by working brkyobrk in the 1st and last brk on the RS in the LS LC row, in every 4th row. Work the Increases 2 (3, 3, 4, 4) times. Transfer the sts to a length of yarn or to a spare circular needle.
Front(s)
The left and right fronts are worked separately to the underarms.
Right Front
Lay the saddle strips with the back RS up. Secure the yarn to the outer corner of the right-hand strip and pick up 17 (17, 19, 20, 20) sts from the side of this strip, working from the outer edge toward the center. Turn.
Next wrong side row is the set-up row for two-color brioche stitch. First and last stitches are selvedge sts.
Set-up row (LC): sl 1, *sl1yof, p1, rep from *, end with sl1yof, sl 1. Do not turn, slide work to the other end of the needle.
Set-up row (DC): p1, yb, *brk1, yfsl1yo, repeat from *, end with brk1, p l last st. Turn.
Row 1 (LS, LC): bring LC under DC, sl 1, *yfsl1yo, brk1, repeat from * to last 2 sts, end with yfsl1yo, sl1. Do not turn, slide work to the other end of the needle.
Row 1 (LS, DC): k1, yf, *brp1, sl1yof, repeat from * to last 2 sts, end with brp1, yb, k1 last st. Turn.
Row 2 (DS, LC): bring LC under DC, sl1, *sl1yof, brp1, repeat from * to last 2 sts, end with sl1yof, sl1. Do not turn, slide work to the other end of the needle.
Row 2 (DS, DC): p1, yb, *brk1, yfsl1yo, repeat from * to last 2 sts, end with brk1, p1 last st. Turn.
Repeat rows 1-2 two more times, total 6 rows.
Work LS LC row as established. Work LS DC row as est, at the end of the row cast on 6 (7, 7, 7, 8) sts for the neck.
Continue to work as established, working total 24 (24, 24, 24, 26) rows.
On RS place marker on the 1st brk stitch. This is where increases for underarm shaping are made.
Next 8 (12, 12, 16, 16) rows work as established and increase for 2 sts at the beginning of the row by working brkyobrk in the 1st brk on the RS in the LS LC row, in every 4th row. Increase 2 (3, 3, 4, 4) times. Transfer the sts to a length of yarn or to a spare circular needle.
Left Front
Left front is worked the same way as right front. For the neck, cast on sts at the end of the 6th DS DC row. The increases for the underarm are made in the last brk of the RS row. Do not transfer sts to a length of yarn.
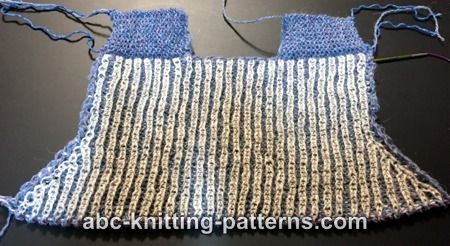
Body
The body of the sweater is worked in the round on 21” circular needles.
Work LS LC row of the left front: knit selvedge st, secure a length of DC yarn to the end of the row (the length should be at least 10” (25 cm)) and cast on 5 sts on the double-pointed needle with this yarn length. Move the stitches to the other end of the needle and work them as follows: (yfsl1yo, brk1) 2 times, yfsl1yo. Knit 1 st (selvedge stitch) of the back and continue to work back stitches as established, knit the last stitch. Cast on another 5 sts for the underarm the same way with DC yarn and work them (yfsl1yo, brk1) 2 times, yfsl1yo. Knit the 1st (selvedge st) of the right front, continue to work right front sts to the end of the row, knit the last st, cast on 5 st for the button band the same way, with DC yarn and work them the same way.
Continue to work two-color brioche st in rounds (see instructions above). Work 52 (60, 70, 74, 80) rows to desired length, taking in consideration the 2” (5 cm) wide rib.. Work 16 rows of rib 1x1 with DC. Bind off.
Sleeve
The sleeves are worked with DC yarn with 16” (40 cm) circular needles. You can also use shorter needles (9” [22 cm]).
Join the yarn to the body at the center of the underarm (3rd st out of the 5 sts cast on for underarm). Pick up and knit 1 st from each of the 3 underarm sts. Pick up and knit 16 (18, 18, 20, 21) from the front (or back) armhole edge. Transfer the shoulder strip sts to the left needle and purl them. Pick up and knit 16 (18, 18, 20, 21) from the back (or front) armhole edge. Pick up and knit 1 st from each of 2 remaining underarm sts, pm.

Work first right-side sleeve row as follows:
Knit 32 (36, 36, 40, 42) sts, w&t.
Knit 16 (18, 18, 20, 21) sts, w&t. This is the wrong-side row across the shoulder strip, which should be in the center of the short row.
Knit the next short right-side row across the shoulder strip and to one more stitch beyond the stitch you stopped in the previous right-side short row. Don’t pick up the wrap, leave it around the stitch. Wrap&turn.
Knit the next short wrong-side row across the shoulder strip and to one more stitch beyond the stitch you stopped in the previous wrong-side short row. Don’t pick up the wrap, leave it around the stitch. Wrap&turn.
Continue to work short rows back and forth across the sleeve cap and working one more stitch on each side every time you make a turn. Work until all the picked up stitches (except 5 underarm sts) taken from the armhole edges are worked into a sleeve cap. Work the last right-side row across all the remaining stitches. The sleeve cap is finished.
Continue to work the sleeve in the round:
Work 100 (126, 138, 150, 162) rows or to desired length, taking in consideration the 2” (5 cm) wide rib.
To shape the sleeve, decrease by 2 sts on both side of the marked stitch by working centered double decrease (s2kp2) every 12th round.
Work rib 1x1 for 16 rounds. Bind off.
Button Bands
The button bands are worked with DC yarn in garter st.
Pick up sts along the front opening of the fronts and work 12 rows of garter st. Bind off. In row 7 on the left button band for boys and right button band for girls work 3 button holes by working *yo, k2tog, starting (or ending) from 4th sts from the neck edge.
Collar
Pick up and knit stitches along the neck edge of the sweater starting and ending at the 1st row of the button band and work 26 rows of garter stitch. To shape the collar, increase by 1 st by working M1 after first 2 stitches at the beginning and before last 2 sts at the end of every right-side row. Bind off.
Finishing
Weave in the ends. Sew on 3 small buttons.

Click image to enlarge

| Patterns: | Knit >> Children Knit >> Sweaters and Tops |
| Difficulty Level: | 4-Experienced |
| Technique: | Brioche In-the-round Seamless Short Rows Top-Down |
| Yarn Weight: | Fingering Sport |