
Free Cardigan Knitting Pattern

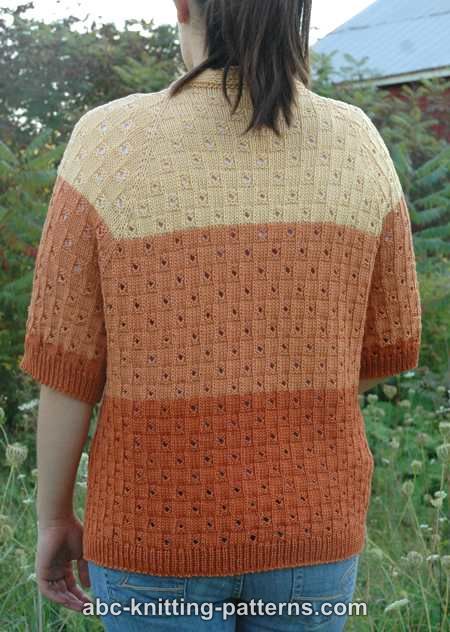
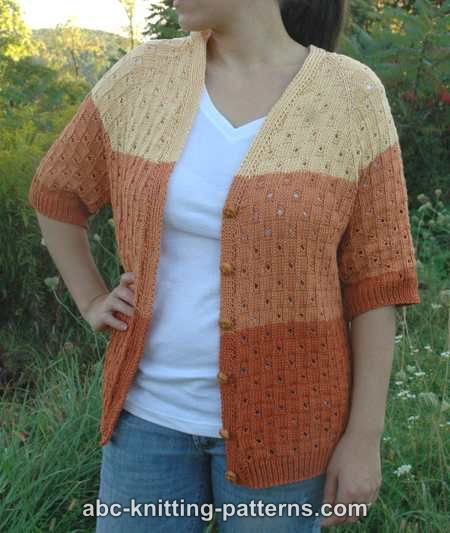
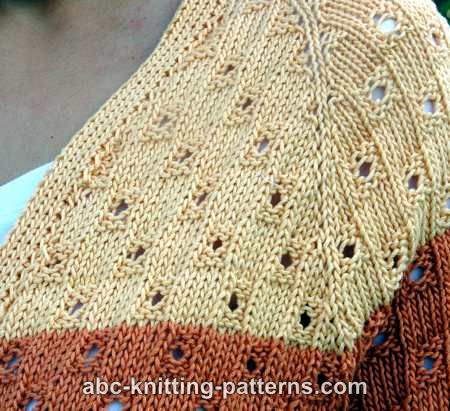
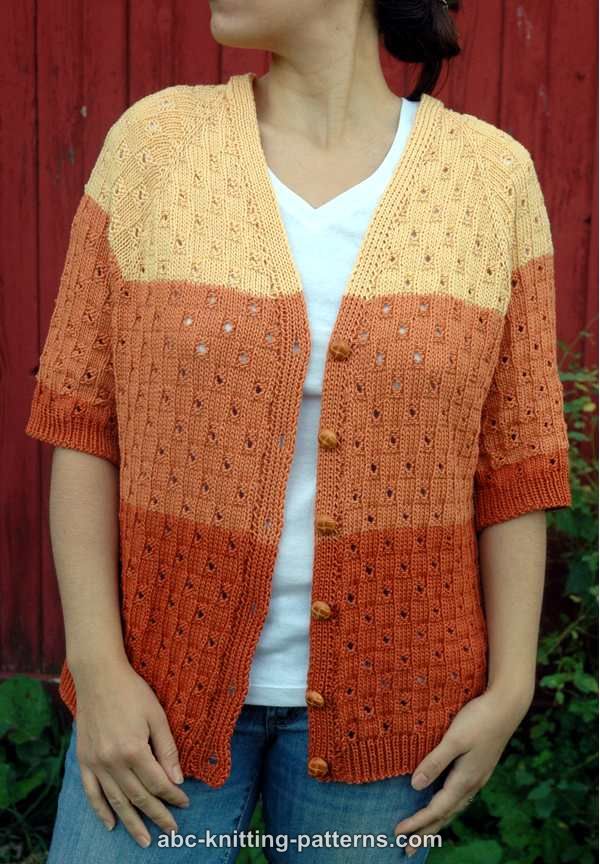
The Grand Canyon Cardigan was inspired by the multi-colored sandstone that forms part of the walls of the Grand Canyon. It features an eye-catching but simple eyelet check texture.
The finished cardigan is light and comfortable. It features raglan shoulders and short sleeves for a more active style.
The cardigan is knitted from the top down without seams.
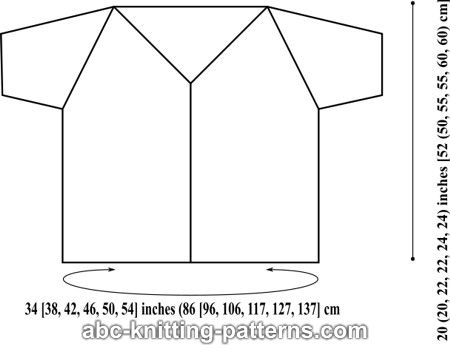
Sizes: S (M, L, XL, 2X, 3X)
FINISHED MEASUREMENTS
Chest: 34 [38, 42, 46, 50, 54] inches (86 [96, 106, 117, 127, 137] cm
Length: 20 (20, 22, 22, 24, 24) inches [52 (50, 55, 55, 60, 60) cm]
Skills Required and Technique Used:
-Knit & purl, cast on & bind off
-Increasing: make 1 (M1)
-Decreasing: knit 2 together (k2tog), slip-slip-knit (ssk)
-Working in the round on double pointed needles
-Working lace patterns
-Picking up stitches
-Working from charts
Materials: Sinfonia by Omega (affiliate link) sport weight yarn (100% cotton), 218 yards (199 meters) / 100 gr, color 806 Light Gold - 2 (2, 3, 3, 3) skeins
Sinfonia by Omega (affiliate link) sport weight yarn (100% cotton), 218 yards (199 meters) / 100 gr, color 842 Cinnamon - 2 (2, 3, 3, 3) skeins
Sinfonia by Omega (affiliate link) sport weight yarn (100% cotton), 218 yards (199 meters) / 100 gr, color 843 Dark Cinnamon - 2 (2, 3, 3, 3) skeins
Needles: circular US #4 (3.5 mm) OR SIZE NEEDED TO OBTAIN GAUGE
Gauge for Eyelet Check Pattern: 22 sts x 32 rows = 4" x 4" (10cm x 10cm)
Abbreviations
RS - right side
WS - wrong side
k - knit
p - purl
yo - yarn over
p2tog - purl 2 together
pm – place marker
mm – move marker
sm - slip marker
Pattern Notes:
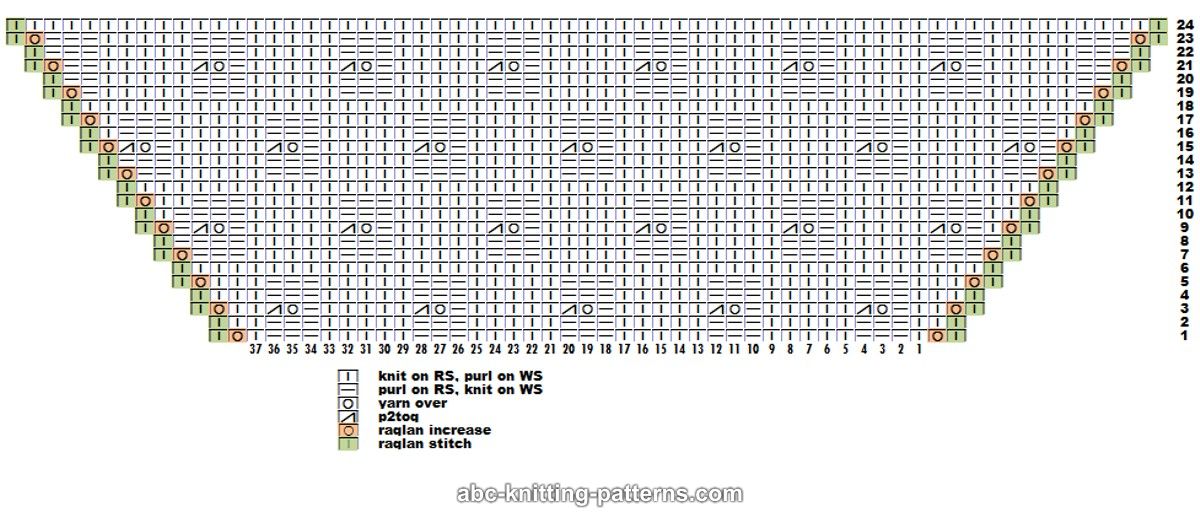
Eyelet Check Pattern in rows: Multiple of 8 sts + 3
Row 1 (RS): k 2, *p 3, k 5, rep from *, end with k 1.
Row 2: p 1, *p 5, k 3, rep from *, end with p 2.
Row 3: k 2, *p 1, yo, p2tog, k 5, rep from *, end with k 1.
Row 4: p 1, *p 5, k 3, rep from *, end with p 2.
Row 5: same as row 1.
Row 6: purl.
Row 7: k 1, *k 5, p 3, rep from *, end with k 2.
Row 8: p 2, *k 3, p 5, rep from *, end with p 1.
Row 9: k 1, *k 5, p 1, yo, p2tog, rep from *, end with k 2.
Row 10: p 2, *k 3, p 5, rep from *, end with p 1.
Row 11: same as ro w 7.
Row 12: purl.
Eyelet Check Pattern in rounds: Multiple of 8 sts
Rnds 1-2 : *k 5, p 3, rep from * to end of round.
Rnd 3: *k 5, p 1, yo, p2tog, rep from * to end of rnd.
Rnds 4-5: same as 1-2.
Rnd 6: knit.
Rnds 7-8: *k 1, p 3, k 4, rep from * to end of rnd.
Rnd 9: *k 1, p 1, yo, p2tog, k 4, rep from * to end of rnd.
Rnds 10-11: same as rnds 7-8.
Rnd 12: knit.
Chain Selvedge: slip the first stitch and purl the last stitch in a row.
Raglan increases are done in right side (RS) rows in the following way: work till marker, m1, sm, knit 1 (raglan stitch), m1. Repeat on all raglan lines, thus 8 stitches are added in each RS row. In the next, wrong side row, purl the m1 stitches.
Make 1 increase - I used the increase described by Elizabeth Zimmerman
Make a backward loop over the right-hand needle and in the next row purl as a regular stitch. See picture here
Cardigan, short overview:
The cardigan is worked from top to bottom, back and forth without seams with raglan increases. The sleeves are worked in rounds. Button bands and neck band are worked in rib 1x1 continuously from the bottom of the right front, to neckline, to left front and end at the bottom of the left front.
Directions
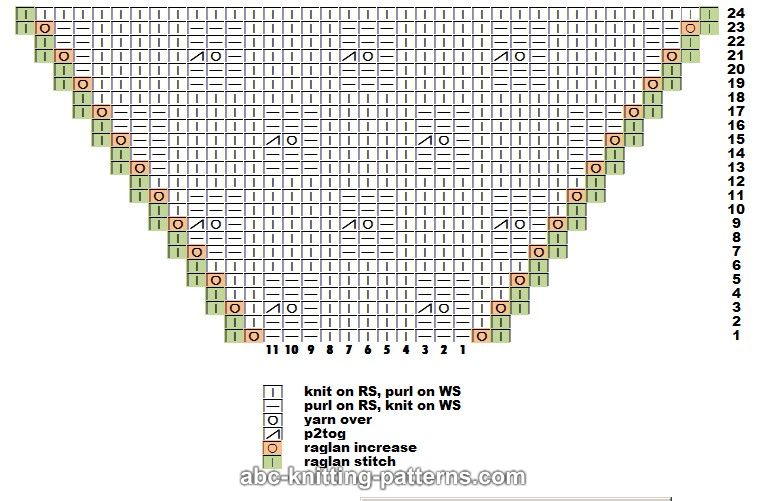
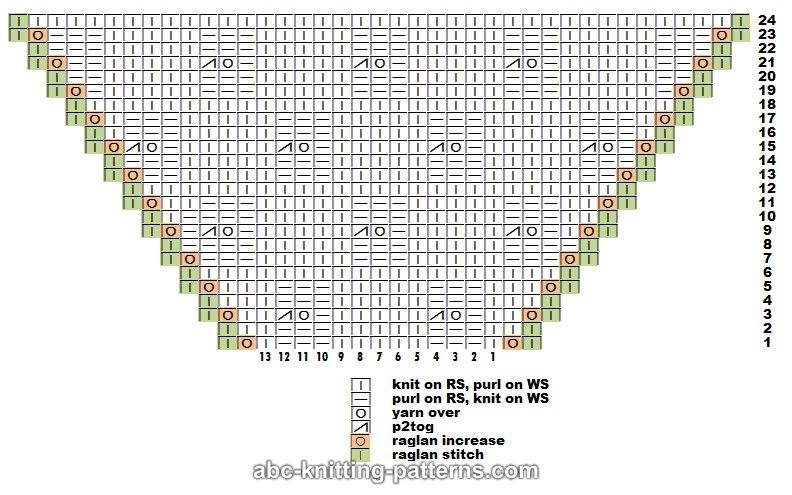
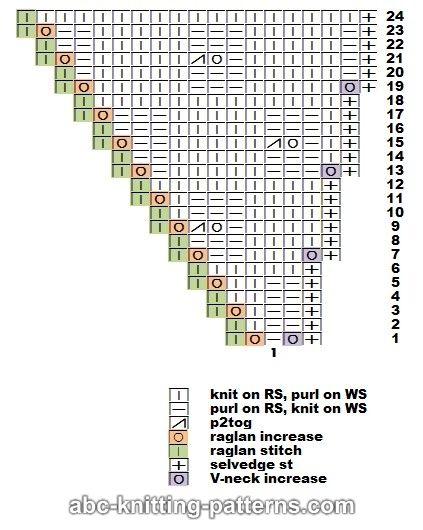
Print out all charts.
With color A, cast on 57 (57, 57, 65, 65, 71) sts and purl one foundation row (wrong side). See color change row count below.
Check the sts and place markers on raglan lines:
1st (selvedge) -1st (left front) - 1 st (raglan, place a marker before this st) - 11 (11, 11, 11, 11, 13) sts (left sleeve) - 1st (raglan, place the second marker before this st) - 27 (27, 27, 35, 35, 37) sts (back) - 1st (raglan, place the third marker before this st) - 11 (11, 11, 11, 11, 13) sts (right sleeve) + 1 st (raglan, place the forth marker before this st) - 1st (right front) - 1 st (selvedge).
Start working the pattern from the charts: Left Front - Sleeve - Back - Sleeve - Right Front.
Work pattern for 30 (28, 36, 52, 48, 44) rows, increasing by 8 sts (double increase at the raglan sts) in each RS row.
In the next 34 (44, 44, 28, 40, 50) rows continue to increase back and fronts at raglan lines in each RS row and continue to increase sleeves at raglan lines in every 4th row 9 (11, 11, 7, 10, 12) times..
At the same time, in order to shape V-neck, beginning from the row 1, increase by 1 st at the beginning and the end of the row (2 sts per row) first in every 6th row 6 (10, 13, 6, 10, 11) times and then in every 4th row 7 (3, 0, 11, 7, 7) times.
Stitch count before division for sleeves: 321 (348, 386, 424, 454, 443, 478).
Back S (M, L)

Click image to enlarge
Back XL (2X)

Click image to enlarge
Back 3X
Click image to enlarge
Sleeve S (M, L, XL, 2X)
Click image to enlarge
Sleeve 3X
Click image to enlarge
Right Front
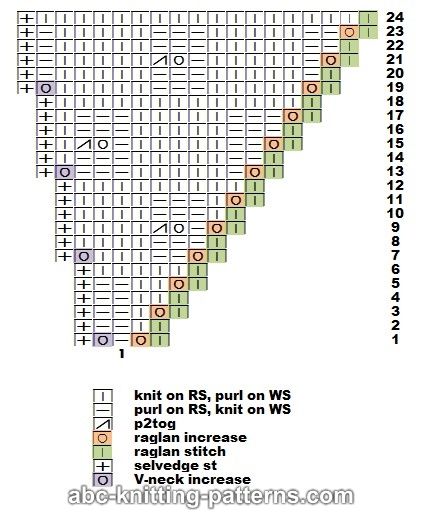
Left Front
Divide for sleeves and bodice
Row 65 (73, 81, 81, 89, 95): work the left front sts as established, transfer the left sleeve sts to a length of yarn, cast on 8 (11, 14, 17, 21, 23) sts with single cast on for the underarm, work back sts as established, transfer right sleeve sts to a length of yarn, cast on 8 (11, 14, 17, 21, 23) sts with single cast on and work right front stitches as established.
Continue to work bodice back and forth for 80 (72, 82, 82, 86, 80) more rows. Mark 2 middle sts of the underarm sts , knit them on RS and purl on WS (this is a faux side seam).
Work 10 rows of 1x1 ribbing.
Color change row count:
Light Gold 1-47 (47, 53, 53, 57, 57) rows
Cinnamon 48 (48, 54, 54, 58, 58) - 95 (95, 107, 107, 115, 115)
Dark Cinnamon from row 96 (96, 108, 108, 116, 116)
Bind off.
Sleeve
Sleeves are worked in rounds.
Transfer sleeve sts from the piece of yarn to the needles and pick up and knit (pu&k) 8 (11, 14, 17, 21, 23) sts over the 8 (11, 14, 17, 21, 23) underarm sts. Place a marker at the beginning of the round.
Work 38 (30, 34, 34, 34, 28) rounds or to desired length. The color changes on sleeves are the same as on bodice.
Work 10 rounds of 1x1 ribbing. Bind off.
Button Bands and Neck Band
Button bands and neck band are worked in 1x1 rib continuously from the bottom of the right front, to the neckline, to the left front and end at the bottom of the left front.
Mark the button placement on the right front. With right side facing , pick up sts with circular needle along the right front edge (you are supposed to pick up each chain selvedge loop as you are going to join the button band to the front at every other row). You don't need to pick up all the sts, you can do this in batches.
Cast on 9 sts and work 1x1 rib (k1, p1) to the last st. Work the last st and the first picked up st together as p2tog. Turn, work 1 x1 rib back. Continue to work the button band joining it every odd row to the front of the cardigan.
At each button marker work the button hole as follows: sl, k1, p1, k1, yo, k2tog, p1, k1, p2tog. On the WS knit the yo.
When picking up sts at neckline, pick up every other st of the cast on sts. Continue to left front. Change the yarn color to match the colour of the fronts.
FINISHING:
Weave in all yarn ends. Block. Sew on buttons to the left bb.
Enjoy!