Autumn in Paris Jacket
 Experienced
Free Sideways Jacket Knitting Pattern

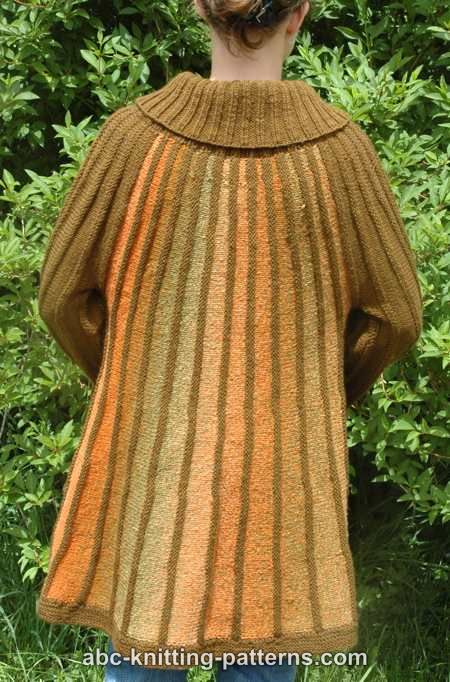
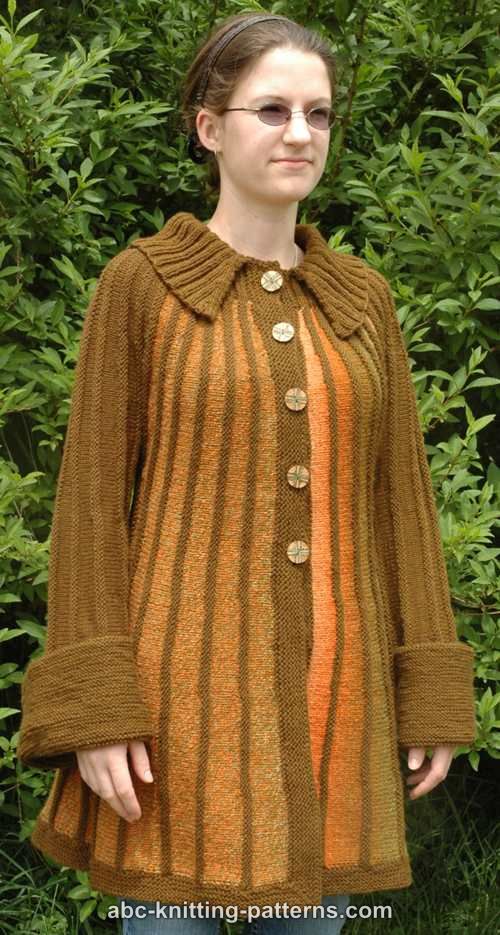
Welcome to the Autumn in Paris Jacket, a stylish and cozy knit jacket perfect for the crisp fall weather. This jacket is knitted using a combination of solid and self-striping yarn to create a unique and eye-catching design. The jacket is worked sideways, with short rows, as one piece, starting from the center of the front and then working the left sleeve, back, right sleeve, and right half of the front. Whether you're walking through the streets of Paris or just looking for a comfortable and stylish jacket for autumn, the Autumn in Paris Jacket is the perfect choice.
Sizes: S (M, L, XL, 2X, 3X)
Finished Measurements
Chest/Bust: Chest: 34 [38, 42, 46, 50, 54] inches (86 [96, 106, 117, 127, 137] cm)
Finished Length: 32 [34, 36, 38, 40, 42] inches (82 [86, 92, 96, 100, 106] cm)
Materials:
Brown Sheep Company, Inc. Nature Spun Worsted weight 100% wool: 3.5 oz (100 gr) 245 yds/
224 m, color 209W Wood Moss - 4 (5, 5, 6, 6, 7) balls (A)
Self-striping DK weight 100% wool yarn 1100 yds / 1000 m (1400/1300, 1750/1600, 2000/1900,
2400/2200, 2700/2500)(B)
The Nature Spun yarn is closer to DK weight yarn than worsted weight, which is why I used it
with DK weight self-striping yarn. If you are going to use another solid color yarn, choose DK
weight yarn. The self-striping yarn I used has long color repeats. If you use self-striping yarn
with short repeats the colors stripes will be narrower than in the jacket on the picture.
Needles:
2 pairs of US size 6 (4 mm) 24" circular needles or OR SIZE NEEDED TO OBTAIN GAUGE
Note: you can use 1 pair of needles and stitch-holders or waste yarn, however I find that for this
pattern, an extra pair of needles is more convenient.
US size 4 (3.5 mm) 60" circular needles OR SIZE NEEDED TO OBTAIN GAUGE
US size 4 (3.5 mm) 16" circular needles OR SIZE NEEDED TO OBTAIN GAUGE
Stitch markers
Stitch holders or waste yarn
Tapestry needle
Five 1" (25mm)-diameter buttons
Gauge: 19 sts x 26 rows = 4"x 4" (10 cm x 10 cm) in stockinette st.
Gauge: 20 sts x 40 rows = 4"x 4" (10 cm x 10 cm) in garter stitch
Special Abbreviations:
w&t = wrap and turn
Make 1 increase (M1) - I used the increase described by Elizabeth ZimmermanMake a backward loop over the right-hand needle and in the next row purl as a regular stitch.
See picture here
Stitch Patterns: stockinette st, garter stitch, 2x2 ribbing.
Pattern Notes:
2 yarns are used, the solid is referred to as A and the self-striping is B
To wrap and turn in the short rows:
With yarn in front sl 1 stitch to the right needle
Move yarn between the needles to the back
Slip the stitch back to the left needle
Turn the work and bring the yarn back to the wrong side between the needles
Jacket Instructions:
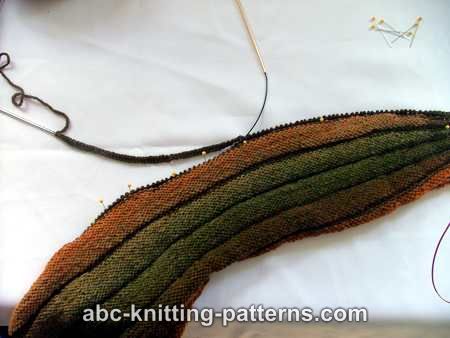
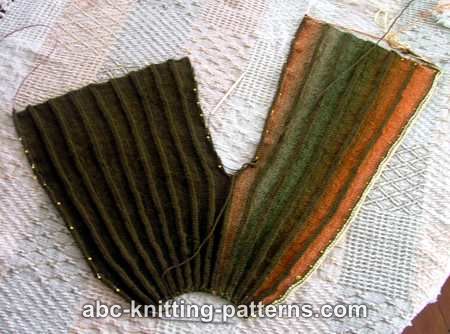
Jacket is worked sideways with short rows as one piece. Start from the center of the front, then
work left sleeve, back, right sleeve, right half of the front.
Short rows are counted as full rows.
Left front:
Cast on 126 (134, 142, 150, 158, 166) sts using provisional cast on method.
With yarn A
Row 1: purl
Row 2: knit
With yarn B:
Row 3: knit
Rows 4, 6, 8, 10, 12, 14 and 16: purl
Row 5: knit to the last 7 sts, wrap and turn (w&t)
Row 7: knit to the last 14 sts, w&t
Row 9: knit to the last 21 sts, w&t
Row 11: k60, w&t
Row 13: k40, w&t
Row 15: k20, w&t
With yarn A:
Row 17: knit all sts, pick up wraps and k together with the st over them
Row 18: knit
Row 19: purl
Row 20: knit
Repeat rows 3-20 5 (6, 6, 7, 7, 8) more times, when working Row 19 of the last repeat, work 80
(84, 88, 92, 96, 100) sts on another pair of needles, leaving 46 (50, 54, 58, 62, 66) sts on the old pair. (Instead, you can purl 80 (84, 88, 92, 96, 100) sts, and then transfer them to a piece of
yarn).
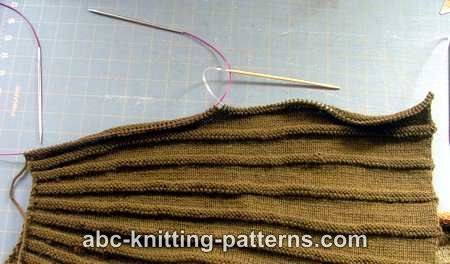
Left Sleeve: Sleeves are worked in color A.
Purl 46 (50, 54, 58, 62, 66) sts which remained on the first pair of needles, turn.
Foundation Row (WS): k 46 (50, 54, 58, 62, 66) sts, co 56 (58, 60, 62, 64, 66) sts using single
cast on method = 102 (108, 114, 120, 126, 132) sts
Row 1 (RS): knit
Rows 2, 4, 6, 8, 10: purl
Row 3: knit to the last 7 sts, w&t
Row 5: knit to the last 14 sts, w&t
Row 7: knit to the last 21 sts, w&t
Row 9: k40, w&t
Row 11: knit, pick up all wraps and knit them together with the sts over them
Row 12: knit
Row 13: purl
Row 14: knit
Repeat rows 1-14 8 (9, 10, 11, 12, 13) more times. When working the last repeat, in row 13 purl
56 (58, 60, 62, 64, 66) sts and transfer them to a piece of yarn, purl the remaining 46 (50, 54,
58, 62, 66) sts.
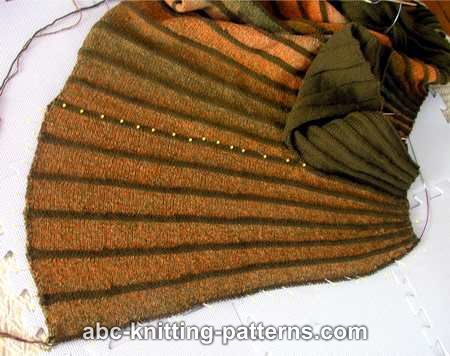
Before continuing, block the working piece.
Now is a good time to try on the jacket to make sure that the width of the sleeve is correct. If the sleeve is narrow, work one more repeat.
Knit the next row: 46 (50, 54, 58, 62, 66) sts of the sleeve and 80 (84, 88, 92, 96, 100) sts of the front from the second pair of needles.
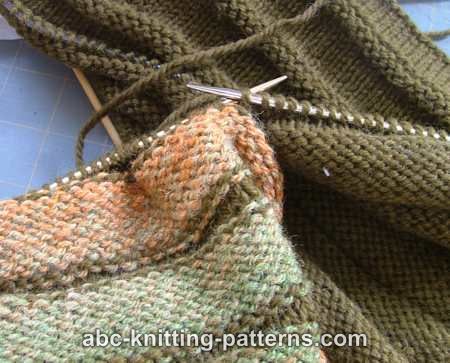
Back
With yarn B, start the pattern from the 3rd row. Repeat rows 3-20 of the pattern 12 (14, 14, 16,
16, 18) times. when working Row 19 of the last repeat, work 80 (84, 88, 92, 96, 100) sts on
another pair of needles, leaving 46 (50, 54, 58, 62, 66) sts on the old pair.
(Instead, you can purl 80 (84, 88, 92, 96, 100) sts, and then transfer them to a piece of yarn.)
Right Sleeve is worked the same way as Left Sleeve.
Before proceeding, block the working piece.
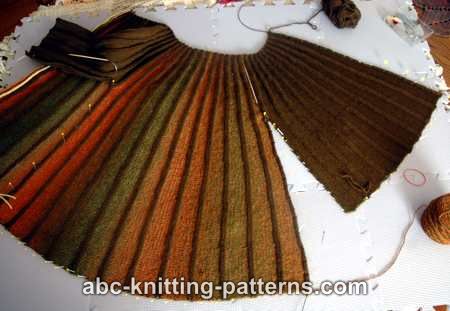
Right Front
With B start the pattern from the 3rd row. Repeat rows 3-20 of the pattern 6 (7, 7, 8, 8, 9) times.
Do not bind off, transfer the stitches to a piece of yarn.
Block the front.
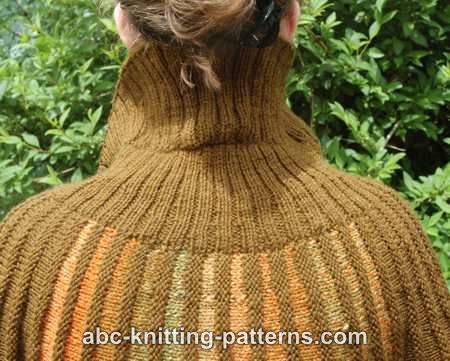
Neckline (Yoke)
Worked with A
Holding the working piece with right side facing, along the upper edge pick up and knit 166
(190, 198, 222, 230, 254) sts.
Row 1 (WS): *k 2, p 2 - rep from * across the row, end with K 2
Row 2 (RS): *p 2, k 2 - rep from * across the row, end with K 2
Row 3 like row 1
For size M repeat rows 2-3 one more time.
For size L repeat rows 2-3 two more times.
For size XL repeat rows 2-3 three more times.
For size 2X repeat rows 2-3 four more times.
For size 3X repeat rows 2-3 five more times.
Row 4: evenly decrease for 16 (18, 19, 21, 22, 24) sts. For this p2tog in groups of 2 purl sts 16
times = 150 (172, 179, 201, 208, 230) sts
Rows 5, 6 and 7: work as established
Row 8: evenly decrease for 16 (18, 19, 21, 22, 24) sts. For this p2tog in groups of 2 purl sts 16
times = 134 (154, 160, 180, 186, 206) sts
Rows 9, 10, 11 as established.
Row 12: decrease for 8 (8, 10, 10, 12, 12) sts. For this p2tog in remaining groups of 2 purl sts 8
times = 126 (146, 150, 170, 174, 194) sts
Rows 13, 14, 15 as established.
The back of the neck is shaped with short rows (12 short rows)
Row 16: work the pattern as establised to the last 10 sts, wrap and turn; work back to the last
10 sts, w&t, work to the last 8 sts, w&t - repeat 9 more times. Then work to the end of the row,
pick up all wraps and work them together with the sts over them;
Row 17: work back the pattern as established, pick up all wraps and work them together
with the sts over them. Bind off.
Note: we'll work the collar from these stitches later, and will pick up the stitches from the bound
off ones. You might wish to leave the stitches open and transfer them to a piece of yarn.
However, beware that in this case the neckline will stretch and you'll have to sew a piece of trim
to support the fabric.
Finishing the Sleeves
Sew the sleeve seams.
With right side facing, and using 16" circular needles, pick up and knit stitches along a sleeve
hem, join and continue to work in rounds.
Work garter stitch in rounds (1 row knit, 1 row purl) until the piece measures 7.5" (19 cm) or to
desired length.
Bind off. Repeat for the second sleeve.
Bands.
Buttonhole, button and hem bands are worked in garter st as one piece in rows. Use 60"
circular needles.
Foundation: Start with the left front, with right side facing, pick up and knit sts along the edge of
the yoke, knit the next 126 (134, 142, 150, 158, 166) sts (from the waste piece of yarn) of the
left front, pick up and knit 1 st in the corner and place a marker on the st.
Pick up and knit sts along the hem, pick up and knit 1 sts in the corner and place a marker on
the st.; knit the 126 (134, 142, 150, 158, 166) sts (from the waste yarn) of the right front, pick up and knit sts on the right yoke edge.
Row 1 (WS): knit all st, except the 2 marked ones, purl the marked sts.
Row 2 (RS): knit.
Since the gauge for stockinette st and garter st are different, you need to adjust the number of
sts on the left and right fronts. For this you have to measure the length of the buttonband and
calculate how many sts are needed. You have to evenly decrease the excess sts in this row.
Evenly decrease 8 sts of the left front;
the corners: m1 before the marked st, k the marked st, m 1 after the marked st.
knit all sts of the hem;
evenly decrease 8 sts of the right front.
Row 3 (WS): knit, the marked st at the corner - purl.
Row 4 as row 2 (no decreases in the front bands) and row 5 as row 3.
Row 6 work as row 4 up to the right front: on the right front band make 5 buttonholes.
Work 6 more rows, even rows work as row 4, odd rows work as row 3. Bind off.
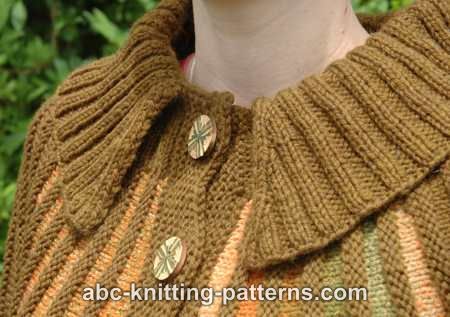
Collar
With right side facing, pick up and knit 128 (148, 152, 172, 176, 196) sts along the neckline edge.
Note: the right side of the collar is the wrong side of the jacket.
Row 1 (RS): Sl 1, *k 2, p 2 repeat across to the last 3 sts, k 3.
Row 2 (WS): Sl 1, *p 2, k 2 repeat across to the last 3 sts, p 2, k 1.
Starting from row 3 increase for 1 st at both ends of the row by working M1 after two first sts
and before the last 2 sts of the row.
At the same time:
Row 3: evenly increase for 14 sts in the 2-purl groups.
Row 9: evenly increase for 16 sts in the 2-purl groups
Work 28 rows
Bind off.
Finishing
Sew on buttons.