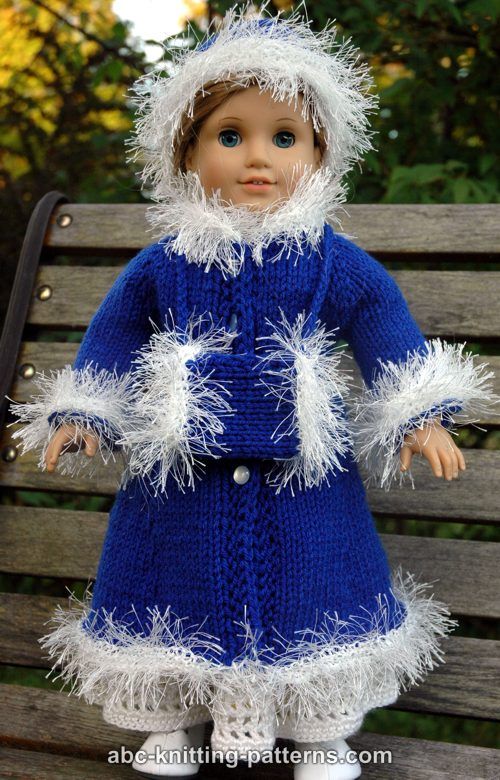

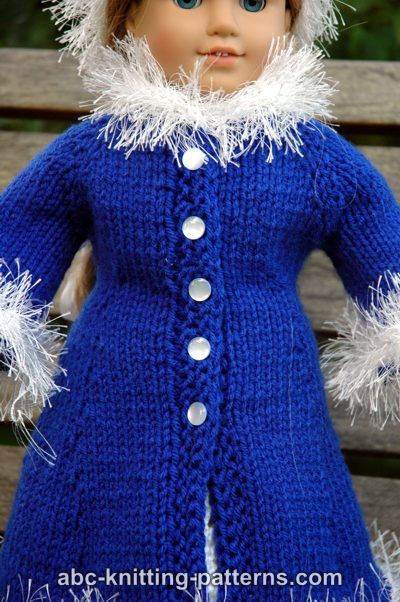
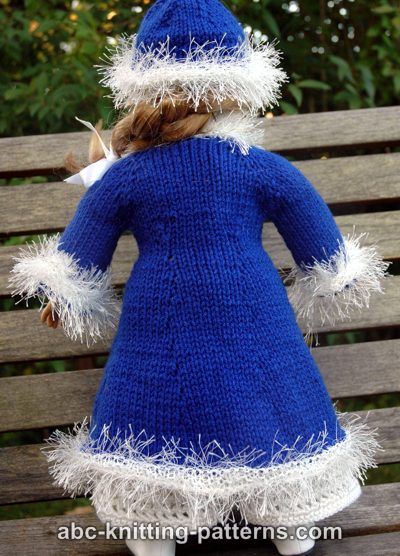
Free Doll Coat, Hat and Muff Knitting Patterns

The outfit consists of a long coat with raglan sleeves embellished with Faux Fur, a matching hat and a muff.
Skills Required/Techniques Used:
-Knit & purl, cast on & bind off
-Increasing: make 1 (m1), yarn over (yo)
-Decreasing: knit 2 together (k2tog), slip-slip-knit (ssk)
-Working in the round on double pointed needles
-Picking up stitches
-Basic crochet (optional)
Materials: Red Heart (affiliate link) Super Saver 100% acrylic yarn worsted weight, color Blue, 333 m (364 yds)/198 g - 1 skein. (yarn A)
Lion Brand (affiliate link) Fun Fur 100% Polyester yarn, color white, 64 yards (59 meters) / 50 gr - 1 skein (yarn B).
Notions:
- Stitch markers
- Stitch holders or 2 pieces 10” long of contrasting color waste yarn to hold stitches
- Yarn needle
- 4-5 small buttons
- Sewing needle and thread of color matching the yarn for attaching the buttons
Needles: US 6 (4.0 mm) circular and double pointed needles OR SIZE NEEDED TO OBTAIN GAUGE
Gauge: 14 sts+ x 24 rows = 4"x 4" (10 cm x 10 cm) in stockinette stitch
Abbreviations:
dpn – double pointed needles
K – knit
P – purl
St , sts – stitch, stitches
pu&k - pick up and knit
as est. - as established, work as the pattern demands, here knit the RS rows and purl the WS rows.
co – cast on
RS – right side
WS – wrong side
yo - yarn over
k2tog - knit 2 together
ssk - slip-slip-knit
m 1 - make 1 increase - I used the increase described by Elizabeth Zimmerman: make a backward loop over the right-hand needle and in the next row/round purl/knit it as a regular stitch.
bb – button band
sm - slip marker
Stockinette in rows:
Row 1: knit
Row 2: purl
Repeat rows 1-2.
Stockinette in rounds:
All rounds knit.
Garter Stitch in rows:
All rows knit
Garter Stitch in rounds:
Round 1: knit
Round 2: purl
Repeat rounds 1-2.
Make 1 increase - I used the increase described by Elizabeth Zimmerman
Make a backward loop over the right-hand needle and in the next row purl as a regular stitch. See picture here.
Edge/selvege stitches: slip the first stitch as if to knit and purl the last stitch.
Raglan increases: Increase for raglan by making 1 st (m1) on each side of indicated, marked, stitch in every right side (RS) row: m1, sm (slip marker), k1 (raglan st), m1. There are 4 raglan lines, that's why the number of sts increases by 8 in every RS row.
Button bands (bb) are worked together with the body of the cardigan, on 3 sts in the beginning and 3 sts in the end of the row, in garter stitch, all rows knit.
Button holes are worked on the right bb in the end of the RS (right side) row: k1, yo, k 2 tog, p1(edge st). Make button holes in the 1st, 11th, 21th, 31th, and 41th (optional) rows. Alternatively you can work the button bands without button holes and use sew-on snaps.
Directions
Coat
The coat is knitted from the top down back and forth without seams and finished with Faux Fur edging.
Cast on 35 sts and purl one foundation row.
Check the sts and place markers:
1st (edge st) + 3 sts (left bb) + 4 sts (left front) + 1 st (the first raglan line, place a marker before this st) + 4 sts (left sleeve) + 1st (the second raglan line, place the second marker before this st) + 7 sts (back) + 1st (the third raglan line, place the third marker before this st) + 4 sts (right sleeve) + 1 st (the forth raglan line, place the forth marker before this st) + 4 st (right front) + 3 sts (right bb) +1 st (edge st).
Rows 1 and 11 (RS rows with raglan increases and button holes): sl1, k3, *knit all sts till marker, m1, sm, k1, m1 - repeat from * 4 times, knit all sts till the last 4 sts, k1, yo, k2tog, p1. (+ 8 sts)
Row 2 (WS and all WS rows) sl 1, k3, purl all sts to last 4 sts, k3, p1.
Row 3 (RS and all RS rows with raglan increases): sl1, k3, *knit all sts till marker, m1, sm, k1, m1 - repeat from * 4 times, knit all sts till the last one, p1. (+ 8 sts)
Work as described 14 rows.
After row 1 the number of sts = 43 sts
After row 3 = 51 sts
After row 5 = 59 sts
After row 7 = 67 sts
After row 9 = 75 sts
After row 11 = 83 sts
After row 13 = 91 sts
Divide for sleeves and bodice:
Row 15 (RS): sl 1, k15, transfer the next 18 sts of the right sleeve on a piece of waste yarn, co 2 for underarm, k23, transfer the next 18 sts of the left sleeve on a piece of waste yarn, co 2 for underarm, k15, p1. = 59 sts
Row 16 (WS): sl 1, k3, purl 51, k3, p1
Waist shaping:
Row 17 (RS, decrease row): sl 1, k7, (ssk, k6) x 3 times, (k2tog, k6) x 2 times, k2tog, k8, p1. =53 sts
Rows 18 and 20 (WS): sl 1, k3, purl to last 4, k3, p1.
Row 19 (RS, decrease row): sl 1, k7, (ssk, k5) x 3 times, (k2tog, k5) x 2 times, k2tog, k7, p1. =47 sts
Row 21 (RS, row with button hole): sl1, knit to last 4 sts, k1, yo, k2tog, p1.
Skirt shaping:
Row 23 (RS, increase row) : sl1, K7, *(m1, k6) x 2 times, m1, k7 repeat from * 2 times, p1. =53 sts
Row 25 (RS): sl1, 51, p1.
Row 27 (RS, decrease row): sl1, k8, (m1, k7) x 5 times, m1, k8, p1. =59 sts
Row 29 (RS): sl1, K57, p1.
Row 31 (RS, increase row with button hole): sl1, k9, (m1, k8) x 2 times, m1, k7, (m1, k8) x 2 times, m1, k7, yo, k2tog, p1. =65 sts
Row 33 (RS): sl1, k63, p1.
Row 35 (RS, increase row): sl1, k10, (m1, k9) x 2 times, m1, k7, (m1, k9) x 2 times, m1, k10, p1. =71 sts
Row 37 (RS): sl1, k69, p1.
Row 39 (RS, increase row): sl1, k11, (m1, k10) x 2 times, m1, k7, (m1, k10) x 2 times, m1, k11, p1. =77 sts
Row 41 (RS): sl1, k73, yo, k2tog, p1. Note: in this row the button hole is optional.
Row 43 (RS, incrrease row): slq, k12, (m1, k11) x 2 times, m1, k7, (m1, k11) x 2 times, m1, k12, p1. =83 sts
Row 45 (RS): sl1, k81, p1.
Row 47 (RS, increase row): sl1, k13, (m1, k12) x 2 times, m1, k7, (m1, k12) x 2 times, m1, k13, p1. =89 sts
Work 15 more rows as est.: RS rows: sl 1, k to last st, p1. WS rows: sl1, purl.
Work 6 more rows with Fun Fur yarn in garter stitch: all rows knit.
Bind off.
Sleeves
Sleeves are worked in rounds on double pointed needles.
Transfer 18 sleeve sts from the piece of waste yarn to the needles, distribute them evenly, and pu7k 2 sts over the 2 underarm sts. Place a marker at the beginning of the round between these 2 picked-up sts.
Work 20 rounds of stockinette stitch: all rounds knit. Work 4 more rounds with FUn Fur yarn in garter stitch: 1 round knit, the next round purl.
Bind off.
Finishing
Weave in all yarn ends. Sew on 4-5 buttons on the left button band.
With Fun Fur yarn pick up stitches along the neck and work 4 rows of garter stitch.
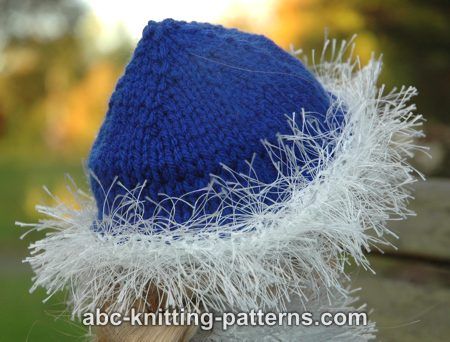
Hat
Hat is worked in rounds, without seams from the bottom up.
With yarn A cast on 48 sts. Join and continue to work in rounds.
Work 12 rounds of stockinette stitch: all rounds knit.
From round 13 decrease by 6 sts in every odd round evenly:
Round 13: *k6, k2tog, repeat from * 6 times. = 42 sts
Round 15: *k5, k2tog, repeat from * 6 times. = 36 sts
Round 17: *k4, k2tog, repeat from * 6 times. = 30 sts
Round 19: *k3, k2tog, repeat from * 6 times. = 24 sts
Round 21: *k 2, k2tog, repeat from * 6 times. = 18 sts
Round 23: *k , k2tog, repeat from * 6 times. = 12 sts
Cut yarn, leaving a 10" (25 cm) tail. Pull through all the sts and secure.
With Fun Fur yarn pick up 48 sts at the bottom edge of the hat and work 6 rounds in garter st. Bind off
Muff
Muff is worked in rounds on double pointed needles as a tube.
With yarn A cast on 20 sts. Join and continue to work in rounds.
Work 16 rounds in stockinette sticth: all rounds knit.
Work 4 rounds in garter stitch with Fun Fur yarn. Bind off.
With Fun Fur yarn pick up 20 sts at the other end of the muff and work 4 rounds in garter sts. Bind off.
Crochet a chain for the strap. You can knit an I-cord instead if you don't crochet, or use a piece of ribbon. Attach the strap to both sides of the muff.

Enjoy!


| Patterns: | Knit >> Doll Clothes >> 18-inch Dolls |
| Difficulty Level: | 2-Easy |
| Technique: | Seamless Top-Down |
| Yarn Weight: | Worsted |
| Yarn Brand: | Lion Brand Red Heart |